Category Archives: Chapters - Page 3

Forth and the AM9511

While working at the University of Puget Sound in 1982, I was searching for a computing solution for one of the Chemistry researchers who was planning a new instrument for physical chemistry. We looked at PDP-11/xx variants and Data General’s smallest systems as well as the latest from HP, which was around $15,000 for a base system. They were all very expensive and carried additional costs for compilers and support. I had a suspicion that an Apple II could do the job but they were also too expensive when you added the risk of not knowing if I could make it work.

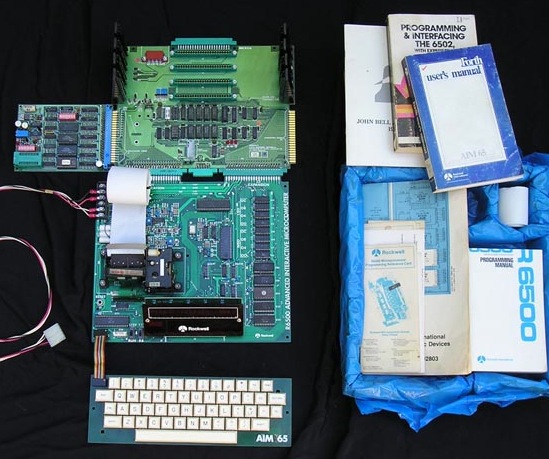
I had bought myself a Rockwell AIM-65 6502 computer board in about 1980 to learn about this microprocessor stuff and explore these new possibilities. I was able to teach myself 6502 assembly programming. It also had BASIC, which was quite slow. And I tried the PLM. PLM had a slow development cycle and it was difficult to expand. There were ROMs for a language called Forth, and I got a set. There was a great Forth manual for the AIM-65 and a fine fellow named Gordy Smith who would help with phone support. My AIM had 1K of RAM which was expanded to 4K after by adding a Little Buffered Mother, a PCB with slots for hardware expansion. I also bought a board for programming PROMs which allowed expansion of the Forth system in ROM. The AIM-65 has a 20 character LED 7 segment display and a 20 character wide thermal printer. Before long this got to be a handicap and I decided to make the big purchase of a Heathkit/Zenith H8 terminal, and there was an editor for Forth that was easy to use over a terminal. After a lot of messing about with analog and digital circuits to make a better vector display that the World didn’t need, I turned my attention to getting more performance from the 6502 and Forth. I made a wire-wrapped expansion board for the AMD AM9511 math coprocessor and wrote a complete interface and math library for Forth. Wow! Some things were more than 100 times faster! And I had fast floating point calculations, integer, single, and double precision, and the conversions. Transcendental functions were also on-chip and a little fancy work with the on-chip stack and I had complex arithmetic and hyperbolic functions.
OLYMPUS DIGITAL CAMERA
Ohio Scientific came out with a 6502 based system with a very inexpensive and massive back-plane system that allowed vast expansion. And there was a Forth for it! We got one of these for the new instrument and I began the wire-wrap boars for 12 bit ADC and DAC and the AM9511. This system had 28K of RAM and a dual 8″ floppy in a huge separate box. In the end it ran stepper motors, a 4096×4096 storage display, a plotter, shutters, and read data from a photon counter. It did all the data collection and analysis (iterative non-linear least squares fits to multiple exponential decays and phosphorescence peak separation) and plotting and all written in Forth, including the fonts for plotter and storage display — in 24K of RAM!

[About this time one of my physics professors and mentor, F.W. Slee, designed a 6502 based single board computer to use in teaching his electronics class, and we shared a lot of programming and hardware ideas. He independently developed a threaded interpreter much like Forth before ever hearing of it.]

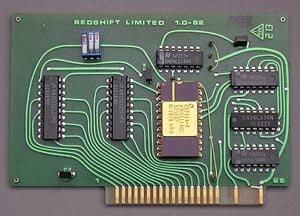
I was able to borrow an Apple II and check the interface. I laid out a circuit board to use the AM9511 in an Apple II/IIe slot and added support for the AM9511 in FigForth and MVPForth on the Apple. I began selling the systems through an ad in Physics Today in March of 1983. I think with ad lead times, I submitted in November or December of 1982 in order to make the March issue.

FFPFSPhysicsToday

And here it is. A few years later at Information Appliance, Mino Taoyama pointed out to me that I did not need the slot address switches and decode logic I included. Doh! I had not understood the cleverness of Steve Wozniac’s expansion slot scheme, which is quite sophisticated! I think it would have taken only one decoding chip along with the AM9511.  The jumper wire is for selecting 2MHz or 4MHz coprocessor. THAT should have been on the rocker switches! Note the nice swoopy-curvey hand layout. Drat! It should have been 3 chips plus the 9511 and a single slide switch or jumper for speed selection!

OLYMPUS DIGITAL CAMERA

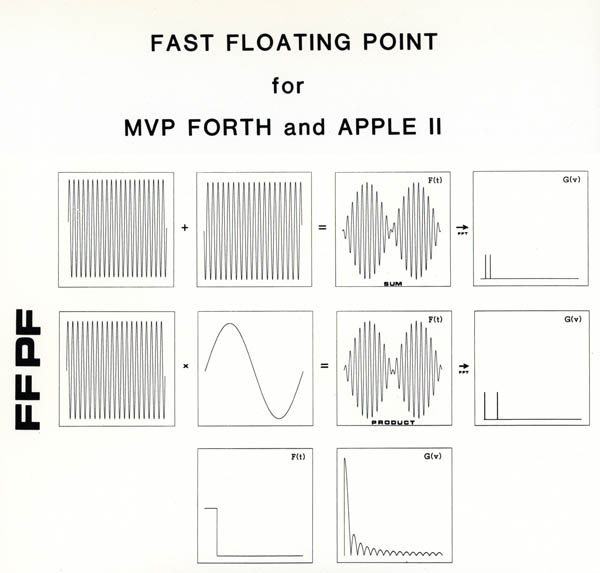
Roy Martens at Mountain View Press was interested in the package and began selling them through his ads in Forth Dimensions, the FIG Forth magazine. Forth is an unusual threaded language in which you program by extending the compiler. It is a precursor to modern (non-Lisp) object oriented programming and takes very little space to store programs and is very efficient with RAM usage. Here is the FFPF user manual cover.

FFPFCoverScanSmall

I wrote a plain old FIG Forth with a few Tom Wempe improvements for the ARM processor. The first ARM I had that actually worked was a design by Art Sobel at VLSI. It is a very cool board that had all the peripherals of a PC of the time.

ARMVLSISobel1

Here it is as I used it a few years later with a CF-II hard drive. 2.5GBytes I think. Lovely board don’t you think?

ARMVLSISobel2

Install IPython Notebook OS X Lion and Debian Wheezy

Installing on OS X Lion. This went very smoothly using Python’s virtualenv. Using the Python that comes with OS X: Rarely has something open source and so useful installed so painlessly!

$sudo pip install virtualenv

Create a folder in your home directory for virtual Python environments. I created another folder inside for a project called TestProject. I plan on using IPython Notebook for projects so the main folder is IPNB and TestProject is inside. To make sure everything is going in the right place, I navigate to the new project folder. I will have a full install of everything needed, won’t interfere with other projects, and it can be thrown out if it gets wrecked. I’m using Python3.4 and calling the test venv  ‘simtest’.

Note: Do not use sudo from here on! Repeat this part for every project, changing names of course.

$cd Documents/IPNB/TestProject

$python3 -m venv simtest
$ls
$simtest

If you get an error about badly placed ()’s, you are not in bash. Just type bash at the prompt to temporarily switch to the bash shell.

Navigate to the venv folder and activate the venv. When activated, the prompt will change to show the venv you are in.

$cd simtest
$source bin/activate
(simtest)$

(simtest)$pip install "ipython[notebook]"

# Lots of stuff ......

I also installed matplotlib.

$ pip install matplotlib
# More stuff ......

Deactivate the venv and activate again.

(simtest) bash-3.2$ deactivate
$ source bin/activate

Start your notebook

ipython3 notebook

Note you need to use ipython3 to run python3 versions. Repeat this for every new project and you can load and remove any special modules and libraries without affecting other projects or dependencies.

Debian Wheezy. I had lots of errors following various tutorials. This works for me and follows this page. I have only added a gotcha about the shell you are using and the location of the Python sources. (I’m using 32 bit Debian for other compatibility reasons.)

Start by making sure some dependencies are installed. You can do this from your home directory.

~$ sudo apt-get install build-essential
~$ sudo apt-get install libncurses5-dev libncursesw5-dev libreadline6-dev
~$ sudo apt-get install libdb5.1-dev libgdbm-dev libsqlite3-dev libssl-dev
~$ sudo apt-get install libbz2-dev libexpat1-dev liblzma-dev zlib1g-dev

Now set up pip with a config file. Don’t ask me what it means, still learning!

~$ mkdir -p ~/.pip/cache
~$ echo '[global]' > ~/.pip/pip.conf
~$ echo 'download_cache = ~/.pip/cache' >> ~/.pip/pip.conf

Get the Python sources you need here on the Python downloads page. The tarball should go to the /tmp directory. I chose the Python 3.4.3 gzipped tarball.

~$ cd /tmp
$ tar -zxf /path/to/your/Python-3.4.3.tgz
$ cd Python-3.4.3
$ ./configure --prefix=/usr/local/opt/python-3.4.3
$ make
$ sudo make install
$ cd /tmp
$ sudo rm -rf Python-3.4.3

Lots of stuff happens with the make commands. If you have multiple cores, you can speed it up with make’s -j option for multiple threads. I have an AMD quad core and used make -j8. Note that as the text flies by there are lots and lots of lines that look like errors. They are OK. Everything built without problems.

The virtual environment. The part you repeat for each project. I’m using Python3 with built in pyenv, an organizing tool for multiple versions of Python that can also provide a simple virtual environment. If you need virtualenv, find directions to install similar to the OSX  above. Here is setting up a pyenv for Python 3.4.3 in the home directory and a projects sub-directory I call IPNB (for IPython Notebook) and a sub-directory for testing, /project1.

$ cd ~/IPNB/project1
~/IPNB/project1$ /usr/local/opt/python-3.4.3/bin/pyvenv virtualenv-3.4.3

I gave the pyenv a long descriptive name, “virtualenv-3.4.3” for this example. It is worthwhile thinking up shorter names because the name is prefixed on every line in the terminal once the virtual environment is activated. You can see it uses the environment constructor from Python 3.4.3 in the /user directory to make the pyenv in the home based ~/IPNB/project1 directory. It also makes fresh copies of Python and everything needed in the new pyenv. Here is a little info on pyenv.

Now activate the pyenv.

$cd project1
$source virtualenv-3.4.3/bin/activate
(virtualenv-3.4.3)$

If you get a command not found error, you are not running the bash shell. Type bash and enter, and try again. Install IPython notebook.

(virtualenv-3.4.3)$pip install "ipython[notebook]"

Your Python version may not include pip. Install it and try again.

Lots of stuff happens……. Install matplotlib.

(virtualenv-3.4.3)$ pip install matplotlib

Lots more stuff happens….. Now deactivate and re-activate the pyenv so it is updated.

(virtualenv-3.4.3)$ deactivate 
$ source virtualenv-3..4.3/bin/activate

You can now launch the notebook and open an existing sample or create a new one. Note that ipython3 notebook is needed if you are using Python 3. For 2.6 or 2.7, just use ipython notebook.

ipython3 notebook

A page will open in your browser – if it doesn’t, you can use the URL that is printed out in the terminal window when notebook starts. You can navigate to other places to get or save notebooks. Note that you can not use the terminal window after this. It will display saves and any other activities. You quit by control-c in the terminal window that you used to launch. control-c twice to skip the [Y/n]. If you need to do other terminal work, you will have to open more terminals.

I have but the notebook files outside the pyenv directory and inside the enclosing project directory. In this case, outside /simTest and inside /venvTest. I should have picked better names. In other owrds, /simTest and pyenv are at the same level. I have no idea if this is optimal or the intention of the creators of IPNB and pyenv.